Sunday, March 22, 2015

Sewing in My Underwear

My Glorious Problems With My First Handmade Cosplay


So to detract from my irritated ranting yesterday, I'm going to lament today about my struggles with this cosplay of Quistis Trepe from FF8 that I've been working on for way too long.

To begin, I don't have much to go on as far as proper examples of what the character looks like.  FF8 was a PS1 era game and the devs must have been seriously against concept art back then.  I've mostly been using a still from combat to keep her as true to game as possible.  Yea, there's the figures and fanart, but that's not what I'm looking for.  I'm looking for what appeared in the game.

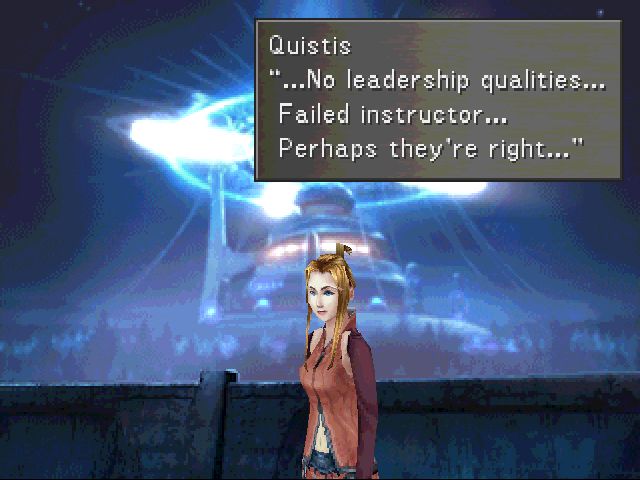
Which leaves me with something like this as my reference picture:

Yep.  Gotta love those PS1 graphics.

Thar is literally the picture I've been using as well.  It isn't great, but it's what's in the game and unfortunately the CGI of her is in her instructor uniform.... which she only has on for a fraction of the game.  Hell, she even stops being an instructor at some point!


That's not even very long into the game either.

So the first issue I ran into was the color of Quistis' outfit.  It's salmon, which for those who aren't familiar is kind of an ugly combination of pink and orange... which meant I wouldn't be able to easily find it at all.  I ended up finding only one type of cloth in the right color, and that was broadcloth.  Not terribly comfortable, but breaths well and is thin enough that it won't be too warm.... except that it's so thin that if I decide to wear something dark under it, you can see right through it without an issue.  That essentially meant that I needed to either double layer the broad cloth or add lining and since I bought it online at fabric.com, I was concerned I didn't have enough for both the top and skirt, so I made a trip to the local JoAnns and bought some liner... only to discover I did have enough and it wasn't that big of a deal.

Oi.  So now I have a lot of ugly salmon fabric.  Hell, maybe I'll make a Quistis plush out of it.

Next came the skirt and top.  Easy right?  At least I thought so.  I found a nice pleated skirt pattern and a nice top pattern that was sectioned off to give the pleated look her outfit has. (Burda 7140 for the top and Very Easy VogueV8773 for the skirt) I was pumped, I was prepared, I was ready.... and then I realized that patterns are complete nonsense.


The shortest skirt length ended up being almost to my ankles, when the pattern clearly shows it just past the knees.  Not a big issue, but still showed that these patterns are obviously made for giraffe people.

The shirt.... the shirt has been a subject of misery for several weekends now.  Here's a picture of it after the first day of sobbing and stabbing myself with pins.


In case you can't tell from there, that's really... way... too big...

This pattern also helped me realize that even if I wear a size 8 dress in real life... that the patterns insist I'm a size 14 or 15... and that... makes me wonder what kind of person would wear the size 8 pattern...?  Giraffe people, probably.  That piece around the neckline is actually two copies sewn together... the original pattern called for just one.  I honestly don't know many people whose neck is only 7 inches around, but I promise they don't exist.  Well... maybe they do.  But they're probably babies.

So as you can see up there, there's a weird curved part of that shirt that was suppose to be sewn on with nonsense according to the instructions.  I ended up figuring it out.  Yesterday.  And that was well after I threw the instructions out and said "I'm making this up from now on."


#Nailedit

Now to be fair, I was actually really happy with the way the whole thing was looking, even with the issues and frustration.  I sat down and worked on it yesterday, trying to finangle a way to make it cover up the bra I'll have to wear under it because let's be real, I'm part of the "Too large NOT to wear one" club and working on adding more pieces so that the bar underneath won't be visible.  I ended up bringing it in and sewing it blindly incorrectly enough times that my seam ripper may be dull right now but had finally gotten to the point where none of it was held together by safety pins and I could really try to hem it and fix it.

So I took the zipper I bought and safety pinned it on only to realize the zipper was close bottom... and I couldn't get it off the dress form with it pinned there, so there was literally no way I was gonna be able to use this zipper.  Sigh.  Two trips to JoAnns two days in a row and it's kinda cold outside right now.  Had to buy a zipper I didn't like nearly as much as the last one and figured I'd get some thinner bias tape for the crazy silver trim she has all over that shirt and finally.... FINALLY.... I think I can finish it...

Wish me luck.  I'll need it.

Saturday, March 21, 2015

It's Ranting Time!

So it's been a while.

I've been trying to only really update this when I have something at least halfway interesting to talk about.  That doesn't happen much often, but hey... I'm terribly boring.

I was thinking about this blog not too long ago and how I hadn't updated it in a while... and how it's name is "Fueled by Rage and Caffeine" and while I absolutely adore that name, I haven't been ranty lately.  It's probably a combination of my medication and my want to try not to be so melodramatic.  I just don't let the things that bothered me once upon a time bother me as much as they used to anymore.

However... there's some things that are really starting to bother me lately and it's things like this, things that SHOULDN'T be happening at all that really light that old flame of anger flare up.

Everyone knows what body shaming is.  It's when you tell a person that the way their body is happens to be wrong.  For a long time (and I'm sure it's still happening) bigger people were getting the brunt of this force.  "You should really lose some weight"; "Look at how terrible and fat that person is", for some examples.  It's a terrible thing to do and a terrible thing to say to people and I love the fact that people are standing up to this and telling others how awful of a human being they are for doing it.  But there's a new kind of body shaming that's been happening in the gaming community something hardcore.  It's kind of always been there, but it's REALLY coming out now.

"Sexy video game characters are not realistic"

Okay.  While some of the games do take it a bit far, to try and tell me that skinny girls with big (natural) boobs don't exist is by far the biggest lie I could ever hear.  They exist.  People know they exist... but they've been deemed "non-realistic".  How does that make the thin women with "large assets" feel?  Now they're subhuman.  Less than human because their proportions are "not realistic".

Give me a moment but... excuse me?

Why is it suddenly okay to body shame thin women with large hips or chests?  Why is this the "right" thing to do?

Long story short?  It isn't.  Body shaming is never okay.  It doesn't matter who you are, what you claim to be, what you are or how many influential people you know.  Body shaming is never okay.  It never was okay and it never will be.  People have enough problems with their own self image and self esteem that they don't need some douche hat telling them that the body they were born with was wrong.

And while I'm on that topic...

Let's talk about how it's also suddenly okay to shame straight, white, cis people.  Let's talk about how it isn't bigotry or discrimination if you're being a colossal ignorant moron about the matter.  "It happened to me so it's totally okay for me to do the EXACT SAME THING to other people while also preaching equality!"

Yea.  "Equality."  Equality for non-straight, white, cis, thin women with large hips and boobs and men.

Someone please tell me that this isn't hypocrisy... because that's all I see here.

Thursday, February 5, 2015

Why I Pronounce it This Way

Or why I will never correct yours

Hello. Last we chatted I was helping people out with a craft wing tutorial... Now I'm going to talk a little bit about my pronunciation - specifically when it comes to words in other languages because let's be real... If I'm mispronouncing an English word, I have more problems than I thought.

So in this case we're going to start with Japanese... But before that I'll give a little background.

I took four years of the language in highschool, which means almost none of it has stuck with me through the years. However, one of the few things that has (on top of proper stroke orders and really random phrases) is the proper pronunciation of the words. Sensei was VERY insistent we pronounced them correctly (she's a Japanese citizen, it's no surprise) so its just one of those things that don't go away.

Japanese itself is very simple when it comes to pronunciation. Every vowel is pronounced the same way in every situation, unlike in English where long and short vowels are a thing. Also, every constonant is attached to a vowel (except for in the case of tsu and n, as far as lone and combined constonants) which means that the syllables for pronunciation are simple. Its sa-ku-ra, not sa-kur-a; as an example.

Now with this embedded on my head, that means that I will ALWAYS pronounce a Japanese word correctly - except for the few words that have been Americanized (karaoke and karate come to mind).  I usually preface in conversation that I will pronounce Japanese words correctly (except for those few), but the most important part of this is that I will not correct YOUR pronounciation unless you want it.  The correct pronunciation is habitual for me.  I learned it that way, it's gonna be used that way.

There's two ways I can go with this knowledge. I can either let peoples mispronounciations slide, or I can correct every single one of them. I always do the former. I actually intentionally point out that I will say them correctly, but I won't correct who I'm talking to. Why? Because it makes me look like a pompous ass and I need to be choosy about what I want to be pompous about.

Which brings me to what provoked this entire particular experience. If I'm not correcting you, you should not be correcting me. If I say "o-ta-ku", for the love of all that is holy do NOT tell me its "o-tak-u" and especially don't tell me it's that because this is 'MURICA and that's how it's said in 'MURICA.

It makes you look like a pompous asshole.

Which, I guess if that's what you're going for, that's cool... But don't expect me to give you the same courtesies I was before.

Sunday, January 25, 2015

Cosplay/Costume Tutorial:

Foam Wings

Hello everyone!  Let's start Arbata's first tutorial... even though it isn't the first thing I've made that I took WiP shots of. :P

To start, collect up your materials.


What you'll need:
- Scissors
- Xacto Knife, or similar precision cutting tool
- Foam sheets (these can be found at any craft store, and any big box retailer that sells crafting supplies, I got these ones from Walmart)
- Cardstock or similar paper to make a pattern (I recommend cardstock as it doesn't crinkle or bend as easily)
- Ruler (a tape measurer works too)
- Pencil or pen (I used a colored pencil so the lines wouldn't be as visible on the foam and it was easier to sketch)
- Elastic
- Thick wire
- Cutting surface (you want a surface that you can cut with an Xacto on that won't get ruined)
- Glue gun (the school glue pictured MAY work to hold the pieces together, but I wouldn't recommend it)


Secondly, you want to have an idea of your pattern well in your head.  You'll need to make an armature for the wings so that they sit on the back properly without moving around.  A simple sketch like the one above is perfect, as you can see I only used stick figures (a lot of my designs are far more involved than that, lol) and I even went so far as to eyeball measurements.

What I ended up doing is measuring the space between the shoulder blades of who I was making it for to figure out roughly how far apart I wanted the wings to be, and then how far from the back I wanted them to stick out... and then completely ignored most of those measurements and just used my pattern to figure out if they were the right size. lol


Next step is to sketch out your pattern.  This is actually the second one I did, as the first one didn't quite match up to the way the ponies wings looked.  You want something that won't be too difficult to cut out, without really losing the concept of the original design.  I promise that reference pictures are absolutely your best friend and please don't be afraid to scrap a design and start over if you don't like the original.

You will need two patterns in total.  A big wing as the base and smaller feathers for inside.  You can see here where I sorta sketched out the idea of what I wanted the whole wing to look like in the end.  I used two pieces of card stock for my pattern, one for the big wing and one for the little.  To make the little so that it fit perfectly on the big one, I cut out the big one first and traced it onto the second piece of card stock so that I could draw the little one in.


This may seem like the most arbitrary or the most obvious step, but make sure once you cut out the pattern that the wings look RIGHT on whomever you're making them for.  If it's for yourself or someone who isn't nearby, then use whoever is nearby... like poor Etheric here.  He was my dummy, and there's nothing he can do about it.  This is a step that's super easy to skip over or forget about, but it has to be one of the most important.  The last thing you want is to get everything put together and then put the wings on only to find out they just don't look right.


Once all that silliness is done, you want to put your patterns on the foam so that they maximize as much foam as possible.  In this picture I lined up the bigger wing against the pre-cut edge, but didn't do the same for the smaller wing.  The other three smaller wings I liked their flat edges up with the foam's flat edge because that makes more sense then whatever I thought I was doing here.  Obviously possessed at that point in time, I don't know.

Then take your pencil, pen, marker, or whatever you happen to be using and trace the pattern onto the foam.  There will be some marks left over on the finished wing, so be careful about what you use exactly, unless you don't care about the marks... then carry on.


Cut out your wings.  I cut them out with regular scissors first and then used the Xacto for precision.  Here you can see the giant blob that's one of the wings, and me posing my Xacto in a way that no one should ever hold their Xacto ever.  I'm a rebel with no concept of what's dangerous apparently. (To be fair, I use an Xacto every day, so I'm a bit reckless with them).

I have a special cutting board specifically designed with Xactos in mind that I cut my wings out on, but any sort of surface that can take the damage can be used.  Just keep in mind that Xactos are VERY sharp and WILL cut whatever surface you're using them on.  My board in this picture I actually turned over because the front has tape on it that I didn't feel like removing because lazy.


You will want to cut a total of six pieces.  Two larger wings and four smaller ones.  The big one are the base and the little ones will go on either side of the base.  Trust me when I say you want this, if you try to go too small, cutting them out will be a pain and they may get too bulky.  Three layers is all you need.


Next you want to make the armature.  The armature is what will hold literally everything together, so its design is important.  A squared off U design with those extra long pieces onto the wings are what I've found works the best.  It keeps the wings from spinning around on your back and keeps them in a nice stiff location.

The lower part of the U was decided by using those measurements I mentioned before.  In the case of these wings, it was four inches long, as that was how much space was between the shoulder blades of whom I was making them for.  I then measured the flat edge of the wing (got 2 inches) and how long the smaller pieces of the wings were for the part that actually goes into them (3 inches).  This is by far the hardest part of the wings, and I can say for sure because I messed up cutting the wire twice before I got the right length.  Add the numbers together (don't forget that there's 2 wings) to get the whole length of wire you need and bend it as fits. (3+3+2+2+4=14.  So my wire was 14in long).

You want to use wire that's thicker and heavy duty, but isn't difficult to bend by hand.  What I used was thick jewelry wire that I also got from Walmart that was also clearanced, so thrifty spending FTW!

I can't stress enough how much double checking you should do before you make anything permanent.  I took the bent wire and held it up to the person's back to make sure it would look right before I glued anything.  Once I was satisfied, I then moved onto the next step.


I bent the wire a little bit out, so that the wings once glued would stick out from the back and not lay flat.  I then took my glue gun and glued the first bit of wire down.  You don't want it directly against the edged of the wings, or the foam won't be able to sandwich together very well.  If you don't have a glue gun, I suggest investing in one, because I'm pretty sure any other type of glue won't hold the wire onto this.  Also, don't worry about the glue melting the foam, if you put too much in one area it may make the foam have weird bubbles in it, but it won't right out melt it unless you put the tip of the gun against the foam itself.

Leave a little bit of the wire armature out at the bottom so you can attach the elastic to it later.  I also suggest gluing wider elastic under the secondary piece, but if your elastic is thin like mine was, you can see what I did further down.


Next, add the second piece.  Do the one covering the wire first to make sure that the wire isn't visible.,  How to glue it isn't really as important, except for making sure the seams are sandwiched together well.  Once again, leave a little wire visible so you can be flexible with your elastic.


Here you can see I didn't do a good job at sandwiching the seam.  What I did is I just put the glue gun right into the seam and pushed it closed, running my finger along the hot glue to keep it flat and smooth because I guess I can't feel heat in my finger tips either.  If the glue is too hot, use a piece of card stock scrap to remove the excess or you'll have glue everywhere... especially because it's hot glue that that stuff strings like CRAZY.

You'll want to repeat the last step to add the smaller feathers to the non-wire side as well.


Now, I used left over elastic from party hats for my mom's 50th birthday, but really anything works.  I made sure that because the elastic was so thin, that I ran it along the seams of the wings where they were sandwiched together, but if you have thicker elastic you'll want to glue it underneath one of the smaller feathers at the top.  The bottom portion of the elastic will be tied, glued or sewn onto the lower part of the U, right where it curves.


And viola!  Once that is done, you have completed your wings!


Oh!  And most importantly, don't forget to try the finished product on and take a picture in your bathroom in the mirror that you should probably remember to clean before doing such things!

<3 Arbata
Hello everyone!

So I created this blog roughly 4 million years ago and then NEVER did anything with it.

BUT.

NOW it has a purpose.

Since I've really started getting into the cosplaying thing, I decided that MAYBE I should post some tutorials or step by steps on how I make some of my more crazy costumes and cosplays... or hell, how I make some of my not so crazy costumes and cosplays.  I have plenty of pictures, I may as well get on that.

So I'll be posting another blog post later with a tutorial for making wings out of craft foam, in specific the ones that I've made and have been making for My Little Pony cosplays.  Hopefully everyone will recognize the design at the very least. lol